Important Disclaimer
eBikeGarageHQ provides educational content and estimates only. We are not certified installers, financial advisors, or electricians. Always consult with licensed professionals.
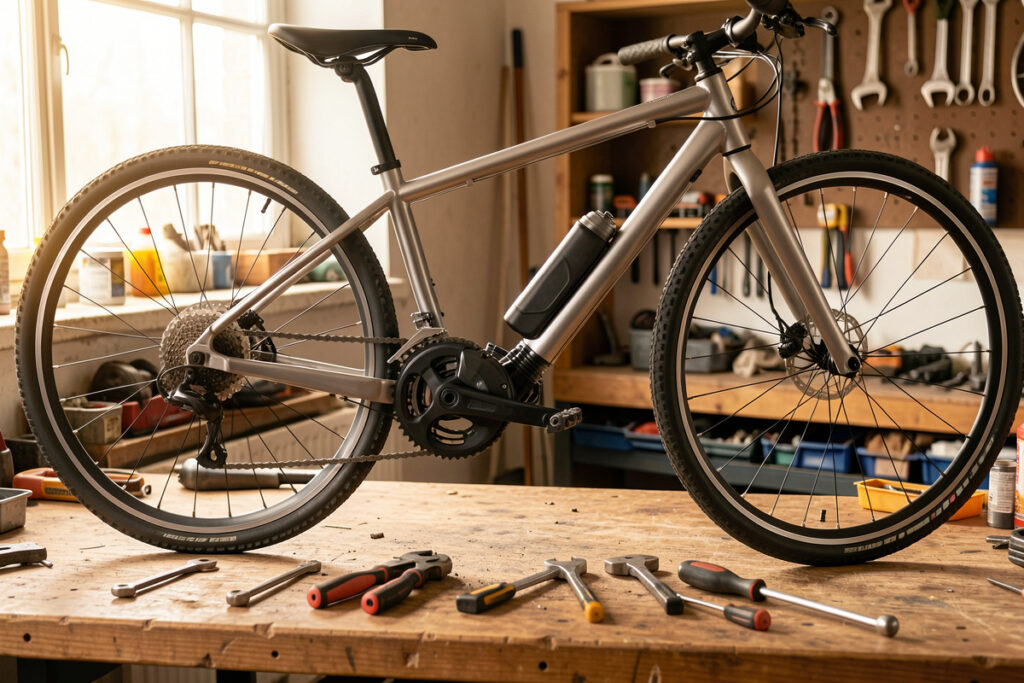
An e-bike conversion turns a bike you already trust into an electric one by adding a motor, a battery, and a controller. Done within the law where I ride — EU 250W, assist cut at 25 km/h — a good mid-drive kit and a quality pack land around €700–€1,200 and add roughly 6–8 kg to the bike. The motor choice matters less than where that weight ends up and whether your frame can take the torque.
I converted my own commuter on the bench in my garage, and this guide is written from that build — the parts I got right, the dropout I nearly cracked, and the battery decision I’d make differently if I did it again. I’ll point you to the deeper spoke articles as we go, but read this first so the whole job makes sense before you spend a krona.
What an E-Bike Conversion Actually Is
A conversion is three systems bolted to a normal bicycle: a motor (hub or mid-drive), an energy store (the battery pack, measured in watt-hours), and a brain (the controller that reads your input and meters power). Everything else — display, throttle or pedal-assist sensor, brake cut-offs, wiring — serves those three. Get the three right and the bike rides like a factory e-bike for a fraction of the money.
The appeal is honest: you keep the frame geometry you already like, you spend money on the parts that move you, and you learn the machine well enough to fix it. The catch is equally honest — you become the manufacturer. There’s no warranty covering the whole bike, and the responsibility for doing it safely and legally sits with you. That trade is the entire reason this site exists, and I think it’s a good trade if you go in with your eyes open.
Where I ride in Sweden, a conversion that stays at 250 watts of continuous rated power with assist cutting at 25 km/h is treated as a bicycle. Step outside that and the bike becomes, legally, something else entirely. I cover that line in detail in the EU conversion legal reality guide, and I am not going to pretend the line doesn’t exist anywhere in this article.
Hub Motor or Mid-Drive: The First Real Decision
This is the fork in the road, and it decides almost everything downstream. A hub motor lives in a wheel and drives that wheel directly. A mid-drive sits at the bottom bracket and drives the chain, so it uses your gears. On my test loop the difference isn’t subtle: the mid-drive climbs Swedish hills in a low gear like it’s nothing, while a hub motor at the same legal 250W bogs down because it can’t change its gearing.
Mid-drives also put the weight low and central, which keeps the bike handling like a bike. Hub motors hang mass off one end of a wheel, and you feel it in the steering or the rear-end planted-ness depending on front or rear placement. The honest cost of that better ride is maintenance: a mid-drive runs your chain and cassette under motor torque, so the drivetrain wears faster. I track that wear closely, and it’s real — but I’d still pick the mid-drive for hilly commuting every time.
If you want the long version, I built two full comparisons: the hub vs mid-drive overview and the specific conversion-kit implications of each, both written from my own builds. For climbing specifically, see what actually climbs on hills.
Choosing the Kit: What I Actually Bought
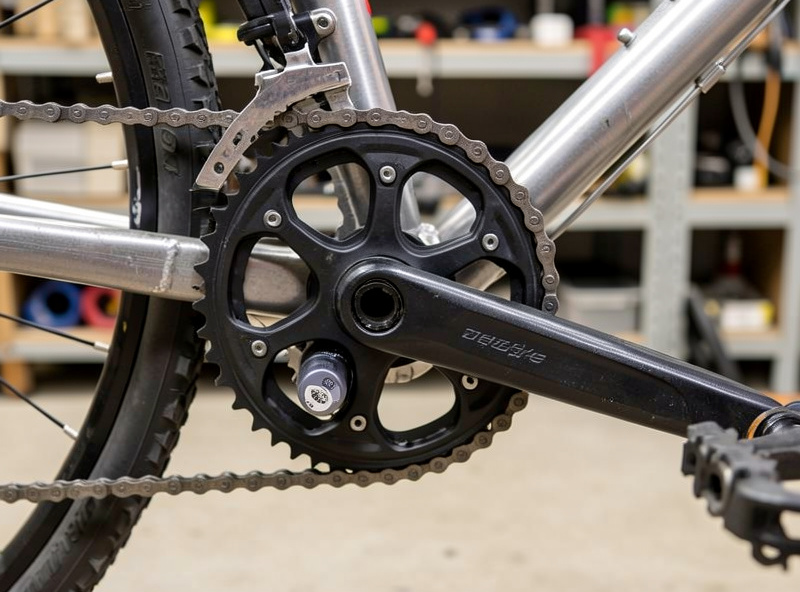
I converted mine with a Bafang-class mid-drive kit, and it’s the platform I recommend for most riders who want a real bike feel. The kit arrives as a motor unit that replaces your bottom bracket, a controller (often integrated), a display, brake levers with cut-off switches, and a pedal-assist sensor. A torque sensor is the upgrade worth paying for — it meters power to how hard you actually pedal, which I cover in the torque vs cadence sensor breakdown.
My full hands-on account lives in the Bafang mid-drive kit experience, including the controller settings I run to keep it legal and smooth. The short version: buy from a seller who supports the EU 250W configuration, check that the bottom-bracket width matches your frame, and don’t skimp on the brake cut-off levers. You can find these kits easily — I keep a running search at the Bafang mid-drive kit listings on Amazon.
As an Amazon Associate I earn from qualifying purchases.
The Donor Bike: Not Every Frame Is a Candidate
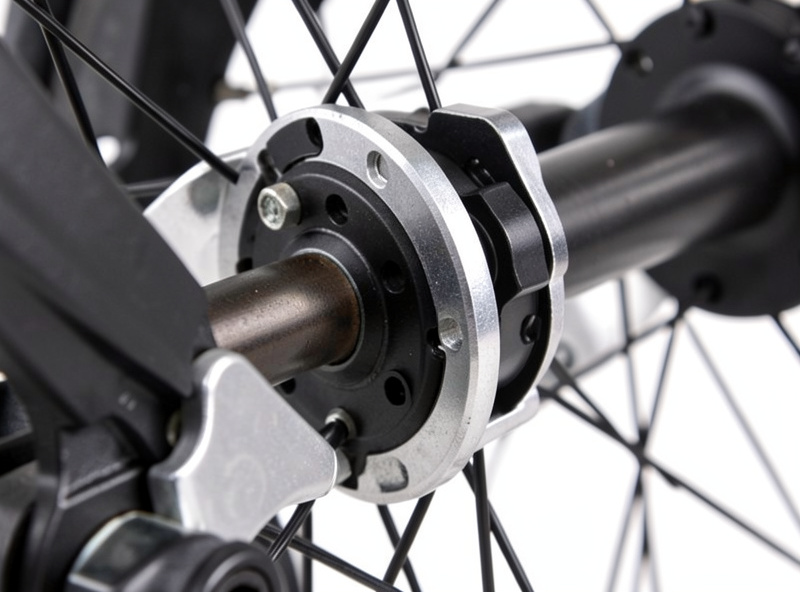
The bike you convert — the donor — has to survive being motorized. A mid-drive needs a standard threaded or compatible bottom-bracket shell and enough frame stiffness to handle the torque without flexing. A hub motor needs dropouts strong enough to hold a powered axle, which is exactly where torque arms come in. Aluminium dropouts and thin-walled frames are the usual failure points.
Wheel size, brake type, and tyre clearance all matter too, plus the simple question of whether the frame is worth the investment in the first place. I lay out the full checklist — including the frames I’d walk away from — in the donor bike requirements guide. A solid steel or quality aluminium hardtail with disc brakes and decent tyre clearance is the safe starting point, and a clapped-out big-box-store bike almost never is.
The Battery: Where the Range and the Budget Live
The pack is the single most expensive part and the one most worth getting right. Range comes from watt-hours — capacity, plain and simple — and Wh is Wh whether it’s pushing my e-bike or sitting on my battery wall. A 500Wh pack at my measured ~10 Wh/km on flat commuting gives me a real 50 km before the numbers get nervous, less in the cold. Marketing range figures ignore wind, weight, hills, and temperature; my logged numbers don’t.
Buy a complete, properly built pack with a real BMS from a reputable seller. I want to be blunt here: building or modifying a pack at the cell level is off the menu on this site. It’s a genuine fire risk, not a money-saving hack, and a bought pack with a warranty is the only kind I’ll write about. The full buying logic — Wh targets, mounting, connectors, and what a good BMS does — is in the battery pack buying guide. You can browse complete e-bike battery packs here.
Once the pack is on the bike, treat it like the expensive chemistry it is. The same charging habits that keep my stationary banks healthy apply directly: avoid sitting at 100% for days, store it part-charged over winter, and don’t let it freeze flat. I keep the full routine in the battery care guide, the 80 vs 100% charging answer, and the winter storage rule.
Torque Arms: The Cheap Part That Prevents the Expensive Failure
If you go hub motor, a torque arm is not optional — it’s the bracket that stops the motor axle from spinning in the dropout and chewing it out, or worse, ejecting under power. A €15 torque arm protects a frame and your collarbones. I’ve seen the gouged dropouts that come from skipping it, and it’s the one place where “it’ll probably be fine” is genuinely dangerous.
Fitting one correctly — orientation, clamp tightness, which side needs it — has more nuance than the instructions suggest. I wrote a dedicated torque arm installation guide covering single vs double arms and the mistakes that make a torque arm useless. If you’re running a mid-drive, the torque goes through the chain instead, so this concern shifts to chainline and bottom-bracket security, which I cover in the kit article.
What the Whole Job Costs and Weighs
Here’s the honest accounting from my build and the ones I’ve helped with. These are street-price ranges for legal, EU-compliant parts, not the cheapest thing on the internet.
| Component | Hub-Drive Kit | Mid-Drive Kit | Added Weight |
|---|---|---|---|
| Motor + controller | €250–€450 | €400–€700 | 3.0–4.0 kg |
| Battery pack (400–500Wh) | €300–€500 | €300–€500 | 2.5–3.5 kg |
| Torque arm(s) / mounting | €15–€40 | €0–€20 | 0.1–0.3 kg |
| Display + sensors + cables | included | included | 0.3–0.5 kg |
| Tools / consumables | €20–€60 | €20–€60 | — |
| Typical total | €600–€1,050 | €720–€1,280 | ~6–8 kg |
Against a €2,000–€3,500 factory e-bike, the savings are real, but I never frame a conversion as a guaranteed money-win — your time and your willingness to maintain the bike are part of the price. What you reliably get is a bike built around your needs and your frame, and the knowledge to keep it running.
The Build, Step by Step
The sequence I follow on the bench keeps mistakes cheap. Confirm the donor frame is a candidate first. Strip the old bottom bracket or wheel. Dry-fit the motor and check chainline (mid-drive) or dropout fit and torque-arm clearance (hub). Mount the battery and route cables so nothing fouls the cranks or rubs the headtube. Wire the brake cut-offs and the sensor, then the display.
Then — and people skip this — do a torque check on every fastener to spec, a slow first roll in the lowest assist level, and a methodical ride-up through the assist levels watching for the 25 km/h cut-off behaving correctly. My first real test is always a lap of my logging loop with the watt-meter, because the bike that feels right and the bike that’s metering power correctly aren’t always the same bike. Re-torque everything after the first 50 km; bolts settle.
Maintenance: You Built It, You Keep It
A conversion shifts maintenance onto you, and at e-bike torque and weight the intervals tighten. On a mid-drive I track chain wear with a gauge and expect a chain to last noticeably fewer kilometres than on an unpowered bike — the motor’s torque accelerates stretch. Brake pads wear faster at e-bike speeds and mass, so I check them more often than I used to. On a hub build I re-check spoke tension and the torque-arm bolts on a schedule, because vibration walks fasteners loose.
None of this is hard; it’s just real. The maintenance load is one of the honest differences between the two motor types, and I compared them directly in the hub vs mid-drive maintenance article. Budget for a chain, an occasional cassette, and pads as running costs, and the bike will outlast the bike you started with.

Range Reality on a Converted Bike
A converted bike obeys the same range math as any e-bike: energy in the pack divided by energy used per kilometre. I log mine on a repeatable loop with the temperature and assist level recorded, and the number that comes back is the number I trust — not the sticker. Terrain and assist level move it more than anything, which is why I budget in Wh per km by terrain rather than chasing a single range figure.
Cold is the asterisk nobody prints. My winter range log shows the capacity drop plainly, and it’s the difference between making your commute home and walking the last two kilometres in the dark. If you’re new to thinking this way, start with the range guide and the running cost in the charging cost math — both apply to a conversion exactly as they do to a factory bike.
The Tools You Actually Need
You don’t need a pro workshop, but a conversion punishes the wrong tools. For a mid-drive you need a bottom-bracket tool that matches your shell, a crank puller or the right hex for self-extracting cranks, and a torque wrench — that last one is non-negotiable, because guessing on motor-mount and crank-bolt torque is how things either strip or come loose at speed. For a hub build, add a spoke tension check and good axle spanners.
Beyond that it’s cable ties, heat-shrink for tidy connector protection, a multimeter to confirm the battery and connectors before you trust them, and patience. I log charge energy at the wall with a watt-meter — the same instrument discipline I use on every pack on my battery bench — because once the bike’s together, the wall socket tells you the truth about what the pack actually holds. None of these tools are exotic; most paid for themselves on the first build by stopping a stripped bolt.
Wiring, Connectors and Weatherproofing
The part of a conversion that ages worst isn’t the motor — it’s the connections, especially through a Swedish winter of road salt and slush. I dress every connection on the build with that in mind. Main power connectors get seated fully and supported so road buzz can’t work them loose; a half-seated discharge connector under load is a hot-spot waiting to happen. Where a manufacturer’s connector lives exposed under the down tube, I add a wrap of self-amalgamating tape or a length of heat-shrink to keep salt spray off the pins.
Strain relief is the unglamorous detail that prevents most roadside failures. Every cable leaving the motor, the controller and the display should have a gentle service loop and be tied so the bike’s flex pulls on the tie, never on the connector or the solder joint inside it. I run the loom along the frame on the side away from the chainring, clear of the cranks and the front wheel’s turning arc, and I leave enough slack at the steerer that full bar rotation never tugs a wire taut.
Before I trust any of it, I check continuity and voltage at the battery connector with a multimeter — the same instrument I use on every pack on my battery bench — so the first power-on isn’t also the first time I find a reversed or marginal connection. Once it’s all proven and tidy, a converted bike’s electrics are genuinely low-maintenance; it’s the rushed, unsupported, salt-exposed loom that strands people in February. Ten minutes of tidy wiring at build time is the cheapest reliability you’ll ever buy. Re-check the exposed connectors at the first 50 km service and again when you fit winter tyres, and you’ll catch a working-loose plug long before it leaves you pushing.
The Mistakes I See Most Often
After my own build and helping friends with theirs, the failures cluster into a short list. The first is buying the cheapest no-name kit and discovering it’s configured for 750W or more — illegal here, and a controller you can’t trust. The second is skipping the torque arm on a hub build “just for the test ride,” which is exactly the ride where a powered axle finds the weak dropout. The third is a chainline left ignored on a mid-drive, which eats chains and shifts badly.
The fourth is the battery bought on price alone — a pack with a vague BMS and no warranty is a false economy and a safety question. The fifth, and the most common, is no re-torque after the first 50 km; everything settles, and the bolt that was tight on the bench is finger-loose after a week of commuting. Walking through the build slowly, with a torque wrench and a checklist, prevents nearly all of it. A conversion rewards the patient and punishes the rushed.
Who Should Convert and Who Should Just Buy
I’m honest with people about this. If you have a frame you love, you enjoy wrenching, and you’re willing to maintain the bike, a conversion gives you something a showroom can’t — a machine built around you, and the skill to keep it alive. If you want a sealed, warrantied appliance that you never think about, buy a factory e-bike and save yourself the learning curve. Neither answer is wrong; they’re just different relationships with the machine.
If you’re still deciding which kind of rider you are, the way I’d test it is simple: are you the sort of person who already adjusts your own brakes and indexes your own gears? If yes, a conversion is well within reach. If the thought of a torque wrench makes you uneasy, that’s useful self-knowledge — start with a bought bike and convert your second one once you’ve got the confidence.
Staying Legal: The Part You Don’t Skip
I’ll say it plainly because it matters: where I ride, legal means 250W continuous and assist that stops at 25 km/h, pedal-assist with no unrestricted throttle. A kit configured to those limits is a bicycle in the eyes of the law; a derestricted one is an unregistered, uninsured motor vehicle, and I won’t publish how to cross that line. The reasons are insurance, liability, and the simple fact that a fast heavy bike on a cycle path is a danger to people. The full legal picture — and the US class system for readers there — is in the conversion legal reality guide and the EU vs US spec differences.
Frequently Asked Questions
How much does an e-bike conversion cost?
A legal, EU-compliant conversion typically runs €600–€1,050 for a hub-drive kit and €720–€1,280 for a mid-drive, including a 400–500Wh battery pack. The battery is the biggest single cost, and a quality bought pack is non-negotiable for safety.
Is converting a bike cheaper than buying an e-bike?
Usually yes on parts — a conversion lands well under a €2,000–€3,500 factory e-bike — but your time and willingness to maintain the bike are part of the price. I frame the savings directionally, never as a guaranteed money-win.
Hub motor or mid-drive for a conversion?
For hilly commuting I pick a mid-drive every time because it uses your gears to climb and keeps weight low and central. Hub motors are simpler and cheaper but bog on hills at the legal 250W and need a torque arm on the dropout.
Can any bike be converted to electric?
No. The donor frame needs a compatible bottom-bracket shell for a mid-drive or strong dropouts for a hub motor, plus disc-brake-friendly stopping power and tyre clearance. Thin aluminium frames and worn big-box bikes are poor candidates.
Is an e-bike conversion legal in the EU?
Yes, if it stays at 250W continuous rated power with pedal-assist that cuts at 25 km/h and no unrestricted throttle. A kit configured to those limits is treated as a bicycle. Derestricting it makes it an unregistered motor vehicle, which I do not cover.
How much weight does a conversion add?
Expect about 6–8 kg total — roughly 3–4 kg for the motor and controller and 2.5–3.5 kg for a 400–500Wh battery. On a mid-drive that weight sits low and central, so the bike still handles like a bike.